I had planned to be recluse this month long before everyone needed to be in social isolation. Long-needed foot surgery was scheduled and I made plans to keep myself busy with a personal project while off my feet.
That project is to digitize hundreds of negatives I shot on the streets of Manhattan, Brooklyn, and Queens from 1976 through 1980. With over 10,000 negatives, this project is a bear! The goal is to create a book, an exhibit, and a portfolio, not necessarily in that order. We’ll talk more about the content of the project itself another time. For now, I want to talk about my process.
If you’re a film photography geek, read on. If not, you might want to skip past this.
Fortunately, I was fairly organized back when I shot the images. I had manilla envelopes, each with around 10 rolls of processed negatives, labeled on the outside with dates and places. Some of the envelopes had very little information which I pieced together as I went along.
I started the process using a Nikon film scanner, but found that while the quality was good, image acquisition was too slow, so I got inventive. I cannibalized my old film enlarger, taking my filed 35mm negative carriers. Filing negative carriers to show the black border was a Thing back in the day, and I dutifully filed mine down at some point in the late ‘70s.

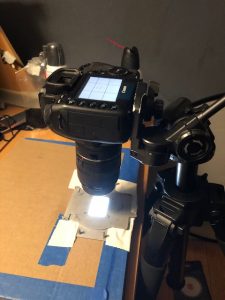
I then took an 8×10” LED light box and masked out all of the light except to leave a space where I taped down the negative carrier using gaffer’s tape. Then I set up my Canon 5D Mark IV with my 50mm macro lens and an extension tube on a Velbon tripod. I then used the Bubble Level app on my iPhone to make sure everything was precise, turned out the room lights, set my lens at f/8, and shot away.
But first, I made contact sheets. I took a second 11×14” light box, switched to a mid-range zoom lens, carefully removed each roll and laid it out so I could photograph all the negatives at once. Back at my computer, I reviewed each image and listed which ones were worth shooting individually. Then, back to the macro lens and smaller LED light box for individual shots using the shot list I’d compiled from my computer contact sheet review. This was the first step in the editing process and even with that, I’ve already scanned and printed around 600 images and I’m only a little past the half-way point. I will need to get this down to under 200 images for a potential book, and to around 50-60 for any kind of exhibit.
Next, Part II: Joyously Lost In The Grain